
Faux Old Vintage Door in the Garden

Faux Vintage Door on Piano Mantel
You know how a while back I decorated my piano like a mantel with foxgloves and pinwheels? And I used an “old vintage door” for the background? That’s a little picture there of it on the right. You can see the chippy white door in the background behind the flowers and the books.
I have a confession. That’s not a door. And it’s not old.
In fact, Mr. Magpie built it and I painted and distressed it the very same day I decorated my mantel (actually piano)!
Had you already guessed? Do you forgive me?
I hope so! Because now I’m going to show you how you can do exactly the same thing!! Hee hee hee!!!

How to Build a Faux Vintage Door in 5 Easy Steps
First of all, you need two packages of “Economy Plank Paneling” and two eight foot long 1″x4″s. For our 1″x4″ we used one called a “furring strip” because it was cheaper and looked nicer (go figure!). The plank paneling is this really thin tongue and groove paneling that you can use for all sorts of things. We get it at Lowe’s and we use it for everything! It’s 8 feet long and comes in packages of 6 boards, and at our local store it’s $8.99 per package.

Economy Pine Paneling and Furring Strip
For this project we only used 8 planks of paneling total, one full package plus two more planks. So you’ll have some leftovers you can use for other projects. It’s handy for all sorts of things.
So — here’s what you do.
Step 1: Cut Paneling Strips
Measure and cut eight of the planks to 78″ long. For the full package, you can actually measure and cut while the wrapper is still on and cut them all at once. Like so:

Measuring and Marking Paneling Strip

Cutting Full Package of Paneling Strips

Taking Wrapper Off Paneling After Cutting
Step 2: Measure and Cut Cross Pieces
Lay your cut strips out on the floor and interlock the little joints so you can tell how wide your faux door is going to be. You need to cut two pieces from your furring strip that will go across the boards to keep them from falling apart. We didn’t bother measuring, we just laid the furring strip across and marked where the cut needs to be. But of course, you can measure if you want to.

Dry Fitting the Economy Pine Paneling
This works better than just giving you a specific measurement, because your materials may be slightly different, and you may push your boards tighter than mine, etc. etc. etc..
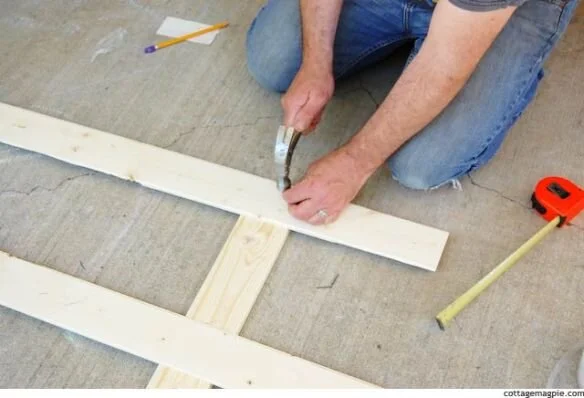
Step 3: Nail Paneling Boards to Cross Pieces
Okay, once you know how big your cross pieces need to be, go ahead and pick up your paneling, and lay your cross pieces down on the ground. Then, starting at one end, start positioning and nailing your paneling pieces on. Measure in from the end to make sure that they’re the same on both ends. Ours are at about 10 1/2″, because that looked good I thought.
And here’s another tip. Only put in one nail each end of the board at first. Then, make sure everything is squared up, using your choice of a carpenter’s square, measuring crosswise both directions, or heck, just eyeball it. It’s not supposed to be perfect, right? Once you have it square, THEN put the second nail in both ends.

Measuring the First Paneling Strip for the Faux Door
Tacking Down the First Paneling Strip for the Faux Door

Measuring the Other End of the First Paneling Strip for the Faux Door
After that you can just press each board into the joints tightly and nail it together, one after the other until you get to the end. Like so:

Fitting the Second Paneling Strip for the Faux Door

Dry Fitting the Economy Pine Paneling
Step 4: Add the Angled Cross-Brace
After your cross-pieces are attached, your door is basically done. You could, if you wanted to, even just use the door like this. For a small project, it would be fine. We thought it would be better to add a little cross-bracing to make the door stiffer, so that’s what we did.
First of all, you have to turn the door over so you can see where the cross-brace is going to go. Then lay your second 1″x4″ across until it’s positioned basically where you want it, but with the ends hanging off. We’ll mark and cut those so it fits perfectly.

Laying out the Angled Cross-Brace on the Faux Vintage Door
Use a scrap pieces of the 1″x4″ left over from making the cross-pieces, and put it on top of the angled cross-brace, but line it up with the cross piece below. Basically you’re making a wood sandwich so that you can draw a line on the angled board so you know where to cut it. Like this…
Make your sandwich…

Marking the Angled Cut on the Angled Cross-Brace on the Faux Vintage Door
…and make your mark:

Lining Up a Scrap Board to Mark the Angled Cut on the Faux Vintage Door
Then it’s a simple matter of cutting the ends on the lines and dry fitting it into the door.

Cutting the Angled Cross-Brace for the Faux Vintage Door

Angled Cross-Brace Dry Fit Into the Door
In order to nail that in, we’ll have to flip it over. It should be snug enough to not fall out, but even if it does, you can slide it back into place and make sure it’s not sticking out at the edges.
But, where to nail it?
Simple! Use one of your leftover paneling boards to make a guide. You can figure out where to put it by where the board shows on the edges. Put it just to the side of where the big board is, and you can use it as a guide to know where to nail through the front of the door and hit the angled cross-brace behind.

Scrap Paneling Strip as a Nailing Guide on the Faux Vintage Door
And there you have it! Construction is complete. Once it’s finished to your liking, you can use it on either side — the plain side:

Faux Vintage Door — Plain Side
Or the braced side:

Faux Vintage Door – Braced Side
But first, of course, you want to finish it!
Step 5: Make It Look Old (Faux Finish)
Of course, if you don’t want it to look old, or don’t want this finish, you can finish it any way you like! First I stained it, one layer of “colonial pine” and one layer of “walnut,” then give it a quick coat of clear poly once it was dry.

Staining the Faux Vintage Door
After it dried thoroughly, I painted two quick coats of paint on it — in this case, Sherwin Williams sample paint (which happens to be satin) in the color “Steamed Milk.” I didn’t let the paint dry all the way between coats, I put the second coat on as soon as I could do it without mushing the first coat.

Painting the Faux Vintage Door
When the paint was still tacky, I distressed it using masking tape, sand paper, a drywall screen, a wire brush, and whatever other stuff was around. I tried to concentrate the wear at the bottom, where it would have taken more abuse, and I used the wire brush to make scrape marks as if it had been kept closed with a primitive wooden latch. Once it looked good to me, I let the paint dry thoroughly and added a coat of poly to keep it from chipping.

Distressed Faux Vintage Door
As a final touch, Mr. Magpie added some old hinges we had laying around in the garage.

Adding Hinges to the Faux Vintage Door
And there you have it! A decorative faux vintage door in five easy steps!!!

Faux Vintage Door
Have you ever made something designed to look old? How did it turn out?

Leave a Reply